Understanding Matrices
Depending on what math courses you've taken, you may already know what a matrix is. If not, it's somewhat important to understand them. In this section I'll explain what they are to those of you who don't know. Once you understand what a matrix is and how to work with it, a transformation matrix will be no sweat for you later on.
A matrix (the plural is matrices) is really just a bunch of numbers all organized in a rectangular grid. The grid can have as many rows and columns as you like, depending on what you're going to be using the matrix for. In the world of mathematics, matrices have applications in almost every field. They are most commonly used in linear algebra, where you try to solve multiple equations with multiple unknowns. They can, however also be used in geometry. That's where we come in. By representing any point using a matrix, we can use a second matrix to modify that point in any way. This is called a transformation. When you have a lot of points that make up shape or an image, you can apply that transformation to every individual point, and the result will usually be something familiar, like a rotation, a stretch, a movement or even combinations of them. That's right, you can make something bigger and titled at the same time.
When you write out a matrix by hand, all of the numbers line up according to their rows and columns and the whole thing is surrounded by two giant square brackets. Unfortunately, there's no easy way to do that here, so when I write out a matrix, I'll just use a bunch of bars on each side to represent it. Don't get too caught up on it, it's just to make it clear where the matrix starts and ends. You'll notice that the Rainmeter help file does the same thing.
Just to get you used to what a matrix is, here are some examples:
Code: Select all
| 1 2 3| This is a 2x3 matrix
|4 5 6|

|1| This is a 3x1 matrix. Normally, we call a matrix with only one column a VECTOR.
|2|
|3|

|15 20.2  4| A 3x3 matrix
| 6  0.1  1|
| 4  5   12|
Transformation Matrices
As I said at the start, one of the applications of matrices is in geometry where we can represent points as matrices and use other matrices to transform them. This is exactly what Rainmeter is going to do for you. At least, it will once you know how to tell it to do that.
Typically, our 2D transformation matrix will look something like this:
Code: Select all
|a c tx|
|b d ty|
|0 0 1| Next we have to have a matrix that represents the position of the point we want to transform. It will look like this:
Code: Select all
|x|
|y|
|1|The transformation matrix used by Rainmeter is exactly like this. The only difference is that since that last row never changes, you don't have to deal with it when you're typing in the TransformationMatrix setting. After all, it would get a little tedious writing in 0;0;1 at the end every single time. Oh, but don't write it in think you're "clever and doing it the right way". That will just cause an error and there will be no transformation for you. Rainmeter leaves it out, so you leave it out.
Applying a Transformation Matrix
Now that we have the model for a transformation matrix as well as a vector for our point, how do we put the two together? How do we say "Hey, Mr. Point, do what that other matrix tells you!". The answer is through multiplication. One of the handy things you can do with matrices is multiply them together. The only caveat is that if you have matrices A and B, AxB does not equal BxA. The order of multiplication is important. I repeat: THE ORDER OF MULTIPLICATION IS IMPORTANT. The matrix on the left must have the same number of columns as the number of rows in the matrix on the right. Here are some examples:
Code: Select all
|1 2 3|   |5 1| This multiplication will work
|4 5 6| x |6 2|
|7 8 9|   |9 4|

|4 7 1.1|   |4| This multiplication will work
|0 2 0.5| x |7|
            |1|

|5 3|   |7 4| This multiplication is downright impossible
|7 8| x |3 1|
        |0 2|
Code: Select all
|a c tx|   |x|
|b d ty| x |y|
|0 0  1|   |1|
That's all there is to it. By doing that, you've successfully transformed that one point. Well... Rainmeter actually does the work, but now you what it does. But how does it work? I haven't told you how to actually multiply the matrices yet, I just told you how to set it up. Multiplying matrices is a little more involved that just multiplying two numbers together. You have to break it down and go row by row, column by column. It should be noted that we already know what the result will look like. Since we are multiplying a 3x3 and a 3x1, the result will be another 3x1. It's no coincidence that it's the same shape as our coordinate vector since the result is just the new set of coordinates. It could be written like this:
Code: Select all
|a c tx|   |x|   |x'|
|b d ty| x |y| = |y'|
|0 0  1|   |1|   |1|
Next, we move on to the second row of the transformation matrix. Again, we take the corresponding values and multiply them: y' = bx + dy + ty. Here, the result is y' (read: y-prime) which is the now location for the y coordinate.
Finally, we move on to the last row of the transformation matrix and do the same thing. Notice that the first two values here are zero. That means that x and y are multiplied by zero, so they have no effect of the result. Then the 1 is just multiplied by 1. That means that the final value is 0+0+1=1. This is why Rainmeter pulls out the last row. As you can see, it will always come out the same. But, we're going to keep it in for now since it will actually be necessary for the more complicated transformations.
If the second matrix had more columns, we would move on the the next one and multiply down all of the rows again. This would give us the next column of the result. But, since we only have a vector our job is done.
Transformations
Alright... now we know what a matrix is, we know what the matrices we want to use look like and we know how to apply our transformations. But just what are the transformations? How do we use this to scale and skew? Well, I'll tell you. The simplest way to think of it is like this: each value in the transformation matrix has a different job. I've already told you that tx and ty are for translations (the fancy word for just plain moving it around). The rest also have specific purposes:
- a is used to scale the x value
- d is used to scale the y value
- c is used to skew the x value
- b is used to skew the y value
Code: Select all
[ ] --> / /Code: Select all
[MeterBG]
Meter=IMAGE
w=200
h=200
SolidColor=255,255,255,128

[MeterSquare]
Meter=IMAGE
w=50
h=50
x=75
y=75
SolidColor=0,0,0
TransformationMatrix=1;0;0;1;0;0
Code: Select all
TransformationMatrix
This defines a 3x2 matrix which can be used to transform the meter. There must be exactly 6 values separated by ';'-character (e.g. "1;0;0;1;0;0") which define the matrix in order of "m11;m12;m21;m22;m31;m32".

            |m11 m21 m31|
            |m12 m22 m32|
So that's it. If you want to stretch it and skew it, then those are the variables to change. but what about rotation? Rotation seems like it would be more straightforward than skewing. After all, I turn things all the time, but how often does a person skew? In the case of transformation matrices, there's no single value you can change that will result in a rotation. The only way to do it is to combine stretching and skewing. Think of it this way: if you skew along the x-axis, all of the vertical lines become slanted. Now, if you skew along the the y-axis, all of the horizontal lines will be slanted. But, what if you skewed it just enough that the angles stayed at 90 degrees? I'm going to save you some time and tell you right now that it works. It's simple too. Just skew it negatively the same amount you skewed it the other way. So, if you skew x by 1, skew y by -1. If you do that, you actually wind up with a 45 degree counterclockwise rotation around the top-left corner. If you want to go clockwise, you switch the positive and negative. So there you go. You have a 45 degree rotation.
Did you try it out? Did you make that sample skin rotate that square with TransformationMatrix=1;-1;1;1;0;0 ? If you did, you'll notice two things. First, the whole thing just moved up to the top. That's got to do with how Rainmeter sees things and we'll get to that later. The second thing you should see is that yes, the square is now a diamond, but it also got bigger. It's actually been multiplied by about 1.414, in case you were wondering. Remember what skewing is? When you skew along the x-axis, the height stays the same. So yes, you do get some nifty diagonal lines, but they're also longer than they used to be. When you skew along the y-axis, you get more diagonals that are also longer than they used to be. Remember when I said that skewing is a combination of skewing and scaling? Well here's how to do it properly. You can't just change a and d to get a smaller square. Try it. It'll get smaller, but it will also rotate more. You have to change what it's skewing by. How do you know what that is? Well, to be honest, it's pretty long winded and I don't want to get into it, so I'll just give you the formula:
- a = cos(angle)
- b = -sin(angle)
- c = sin(angle)
- d = cos(angle)
There you have it. You now know how to scale, skew and rotate. Using these you can get some pretty interesting effects. But first, there's a question on your mind. If you've been experimenting in Rainmeter, then you must surely be asking yourself...
What the hell is Rainmeter doing?!
Glad you asked. You see, when you tell Rainmeter what you want it to do, you have to realize that it sees things differently than you do. For example, if you want to scale something, you see it as wanting to do this:
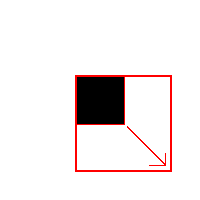
Rainmeter will try to do this:
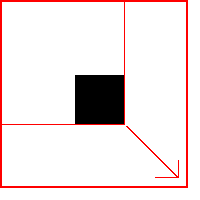
Every transformation you do will always be relative to the origin. That's the point with coordinates (0,0). Normally, that would be the top-left corner of your object. However, according to Rainmeter, the origin will always be the top-left corner of the entire skin. That's why when you rotated the square, it shot up to the top. It rotated alright, but it did it around the top left corner of the whole skin, not around its own corner. For this reason, whenever you scale, skew or rotate something, you have to take into account that the whole thing is going to move. Adjusting for this is pretty simple. All you have to do is pick a point that you don't want to move and translate the whole thing so that that one point is back where it's supposed to be.
Let's say you want to scale it by 1.5 in both directions and have the top-left corner stay in the same place. First, you have to find to coordinates of that point. In this case, it's pretty simple: it's just the x and positions of your square. If you're using the test skin I suggested (and why wouldn't you be?) that would mean that your square is at (75,75). Next, you have to find out where it's ended up and work from there. To do this, just look at our handy-dandy matrix multiplication. If all we're doing is scaling it by 1.5 and our x and y are 75, then the multiplication should look something like this:
Code: Select all
|1.5 0   tx|   |75|   |x'|
|0   1.5 ty| x |75| = |y'|
|0   0    1|   | 1|   |1 |

Or in our case: TransformationMatrix=1.5;0;0;1.5;0;0
x' = 75*1.5 + 75*0 + 1*tx
y' = 75*0 + 75*1.5 + 1*ty
We already know what x' and y' are. We want them both to come out to 75. So, if you plug 75 into both equations and move things around a bit, you'll wind up with this:
tx = 75 - 75*1.5 = -37.5
ty = 75 - 75*1.5 = -37.5
And that's all you need to do to find how much we need to move our square back by. So, our new transformation matrix comes out to:
Code: Select all
|1.5 0   -37.5|   |75|   |x'|
|0   1.5 -37.5| x |75| = |y'|
|0   0     1  |   | 1|   |1 |

Or in our case: TransformationMatrix=1.5;0;0;1.5;-37.5;-37.5
x' = 75*1.5 + 75*0 + 1*-37.5 = 75
y' = 75*0 + 75*1.5 + 1*-37.5 = 75
Of course, by "we do the math" I mean "Rainmeter does the math". Remember that this part will be taken care of by Rainmeter, but it's good to know exactly what going on so that you aren't shooting in the dark when something goes wrong and you need to fix it. By the way, in case you hadn't noticed, our square's back where it should be. Happy day!
That technique will work for any transformation you use. Of particular interest is when you use it with rotation. When you rotate something, the center of rotation is the only point that won't move. Every other will go around it by however much you specify. If you want an image to just rotate about itself, you can use the center of the image as the center of rotation and use the technique you just learned to shift that point back to where it started off. In fact, let's try it with our square. Let's say we want the square to rotate by 30 degrees counterclockwise about its own center. First, where's the center? Well, in our case, it's right smack dab in the middle of the skin: (100,100). Next, we'll need to figure out the transformation matrix for a 30 degree rotation. If you remember, that's a scale and a skew in every direction using the sin and cosine of the angle. This is what it'll look like:
Code: Select all
| cos(30) sin(30) tx|   |100|
|-sin(30) cos(30) ty| x |100|
|       0       0  1|   |  1|
tx = 100 - 100*cos(30) - 100*sin(30) = -36.6025
ty = 100 - 100*-sin(30) - 100*cos(30) = 63.3975
Some of you might be complaining that there are a lot more than four decimals in the answers, but Rainmeter doesn't actually need them all. It does well enough with just a few. So now let's see what our full transformation matrix will look like:
Code: Select all
| cos(30) sin(30) -36.6025|   |100|
|-sin(30) cos(30)  63.3975| x |100|
|       0       0   1     |   |  1|
TransformationMatrix=0.86602;-0.5;0.5;0.86602;-36.6025;63.3975
And that will get you a square that is rotated counterclockwise by 30 degrees around its center. What's that? You wanted it to go clockwise? Well just switch around values b and c and recalculate tx and ty. It should come out to:
TransformationMatrix=0.86602;0.5;-0.5;0.86602;63.3975;-36.6025
Those are the basics. You can now stretch, slant and spin a meter in any way you like. But, keep reading because it gets better!
Multiple Transformations in One!
You might be thinking to yourself "Hey, I like rotating and stretching, but what if I want to do both?". Well the answer to that is not so obvious. Let's say you wanted to rotate it and double the size. You might be thinking that you know how to rotate it and you know that the a and d values are for scaling, so why not do a rotation and double those values? Well, remember what happened when you first tried to simply scale that first skew-rotation? It changed the angle and the new size wasn't easy to predict. So what do you do? The answer is matrix multiplication.
If you wanted to scale and rotate something, the first thing you have to decide is what order you'll do it in. Remember that since we're dealing with matrix multiplication, the order is going to matter. In fact, it's almost intuitive. Let's say that you want to rotate your square 15 degrees around the top-left corner, then scale it so that that top-right corner stays in the same place. Now imagine doing it the other way around. Scale it first, then rotate it. You're going to get different results. Sure, you'll have a square that's twice as big that's tilted, but the two methods get different results. So, before you start, make sure you know exactly how you want to do this.
To figure out how you're going to get Rainmeter to do this, start by thinking how you would do it by hand. If you decided you want to rotate it first, you would apply the appropriate transformation matrix and get its results. Don't worry, I did the math for you:
Code: Select all
| 0.9659 0.2588 -16.8559|   |x|   |x'|
|-0.2588 0.9659  21.9670| x |y| = |y'|
| 0      0        1     |   |1|   |1 |
Code: Select all
|2 0 -123.2916|   |x'|   |x''|
|0 2  -62.0595| x |y'| = |y''|
|0 0    0     |   |1 |   |1  |
Code: Select all
|2 0 -123.2916|   | 0.9659 0.2588 -16.8559|   |x|   |x'|
|0 2  -62.0595| x |-0.2588 0.9659  21.9670| x |y| = |y'|
|0 0    1     |   | 0      0        1     |   |1|   |1 |
In the end, you'll have a new 3x3 matrix. The only problem is that the process of getting this new matrix is long, tedious and error-prone. But, there's a better way. Make someone else do the work for you! There are many different resources that will multiply matrices automatically. A graphing calculator will do it, but if you don't have one on hand, you can always go to a website like this one. Just type in your matrices and make sure that in the "C=" field thatthey're multiplying in the correct order (your second transformation goes first). By plugging in our original two matrices, I got the following new matrix:
Code: Select all
| 1.9318 0.5176 -157.0034|
|-0.5176 1.9318  -18.1255|
| 0      0         1     |
TransformationMatrix=1.9318;-0.5176;0.5176; 1.9318;-157.0034;-18.1255
Try it out. Your square will do exactly what it was meant to. First it will rotate itself, with the top-left corner as the center of rotation, then the square doubles in size, keeping the top-right corner where it is.
This technique will work with any two transformations. In fact, if you wanted to transform it a third time, you just need to multiply a third matrix. It all works as long as the order is preserved.
That's it. That's all you need to know. With this information, you can now transform any meter in any way you choose. Using this you can get some pretty interesting shapes. Just remember that left and right sides will always be parallel and the same length, as will top and bottom. That means no trapezoids, no strange quadrilaterals, only parallelograms. But that's your only restriction.
Help! It's not working!
Shut up, sit down and take a deep breath. If it's not working, just go over what you did. After all, it's all math and you're only human which means there are going to be mistakes. Look over what you did step-by-step. Redo it if you have to. Make sure that everything is being multiplied in the correct order, make sure that when you write it out it looks like this: TransformationMatrix=a;b;c;d;tx;ty. If you did multiple transformations, make sure that they were done correctly. After all, different orders can give incredibly different results. Finally, make sure that what you want to achieve is possible. Remember what transformations you're restricted to: scale, skew and rotate. That means that while you can get some interesting effects, there is no way whatsoever that you can get a trapezoid. That is, whatever the left and right sides originally were will always be parallel to one another and will always have the same length. The same goes for top and bottom.
If you've done all this and it's still just not working out, post a question here and I'll do my best to see that it's answered.
Good Luck!
Bonus! Some helpful tips:
The following are just a few tricks that I find useful. In the future, answers to questions may show up here as well.
Specific Skews: So you know how to skew, but how to you skew at the angle you want? Well, the answer is a bit more math. As you may or may not know, the equation of a straight line on a graph is y=mx+b, where x and y are your coordinates, m is the slope of the line and b is a value by which you can shift this up and down. Basically, every time you move the x-value by 1, the y moves by whatever m is, plus whatever b is. This is also exactly what a skew is. If you want to skew along the x-axis, this really means that you're altering the y-values by using x. We can replace the equation of the line with this: y'=bx+dy+ty. That's the equation you already saw for finding where the y coordinate will end up. Now, let's say that you're not scaling, just skewing. We can take out "dy" to make things simple. y'=bx+ty. Again, this means that the y-coordinate depends on the x-coordinate, plus a little bit from ty. How do we use this to find the angle for the skew? Imagine each point as a right-angled triangle. The horizontal side would be what x changes by and the vertical side is what y changes by. If you're just skewing along the y-axis by 1, the triangle would look like this:
Code: Select all
    /|
   / | 1
  /__|
    1
y'=1*yUsing variables:
Unfortunately, there's no way right now (at least as far as I can tell) to use a measure's value in a Transformation Matrix. You can, however, use variables! Any numeric value you put into the [variables] section can be sent to the transformation matrix just like any other variable. This is useful if you have more than one meter using the exact same transformation. All you have to do is set up six variables - one for each value. Then, you will have something like this in each meter that uses it: TransformationMatrix=#a#;#b#;#c#;#d#;#tx#;#ty#. Of course, you can name the variables anything you want. This can actually save you a lot of time from hunting down every instance, and typos are much easier to fix. Keep in mind that every meter will use the same point as the stationary point. So if you decide to scale a bunch of squares, keeping the corner of one of them stationary, all of the others will scale relative to that first chosen point, not their own corners.


